
A product change started me to wrapping my head around Zazzle wrapping paper again.
Update June 2021 TLDR; Zazzle has for quite some time the option to set the tile width in exact inches. That way you can always tile in the length of the wrapping paper without a seam. As long as you keep the amount of tiles a whole number. It works like a charm, the programmers of Zazzle are the best!
It’s Christmas before you know it. Amazon has a great selection of wrapping paper for all seasons. Get your Holliday season paper in stock right now.
Zazzle changed the size of the standard width of their wrapping paper products. They went from 24″ to 30″. Fine with me, I designed for 24″ so I keep to that width. Alas, 30″ is the only option and this is the result.

Normally I create an image of 5400 by 3600 pixels which give me 150 pixels per inch. The standard length is 36″ and the standard width was 24″. After 36″ the image is replicated again, a kind of tiling along the length of the roll every 36 inches.
Those who used a much smaller image and tiled it with the 36 by 24 inch format, wouldn’t have any problems with the new with of 30″. I could tile my large image also (along the width of the roll), but that gives the following ugly result at the edges.

This is because my images take in account tiling along the length of the roll and not the width. The solution is to create smaller square tiles and tile these over the 36 by 30 format. The problem is, how do you resize the square tile so that the row fits exactly in the 36″ length (remember, that 36″ is tiled again along the total length of the roll)?
With some experimenting I figured out that the default dpi for wrapping paper is 100dpi before resizing the image. So, with 36″ length and a square of 100 by 100 pixels will give me a row of 36 tiles. A bit too much, as is a tile of 200 by 200 (18 tiles). The best option is either a tile of 300 by 300 or 600 by 600. Keeping with the 100dpi default the tiles will fit exactly along the total length of the roll. Lets see an example of a 300 by 300 pixel tile:
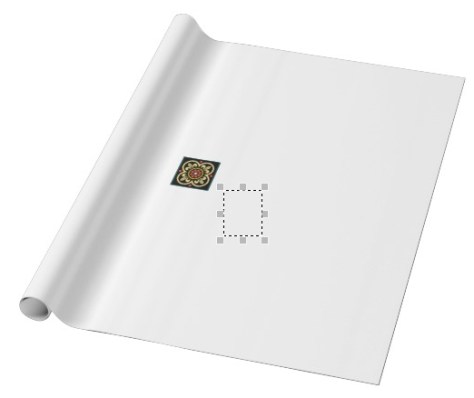
When using the tile function of the Zazzle product tool we’ll get the following result. It looks great and Zazzle doesn’t protest about the low dpi of 100. Apparently it is good enough. But what if you want a higher dpi?

A higher dpi you can get by simply take a larger image (for instance 600 by 600 pixels in a 6″ by 6″ square) and resize to half the size in the Zazzle product tool (for instance 600 by 600 pixels crammed in 3″ by 3″). This should result in 200 dpi, but Zazzle doesn’t allow for exact resizing. Tiling along the length, over the 36″ format, won’t give a nice result.
One strip of tiles to rule them all
For this problem I devised a clever solution. Simply create one image of a row of a desired number of tiles and “fit” this in the standard length of 36″. I created this example of 7200 by 600 pixels (12 tiles).

Next step is to fit this image in the 36″ by 30″ format. So 7200 pixels snuggly fitted in 36″ will get me 200 dpi, good enough for me.

Since tiling along the length of the roll is now fixed properly, I only have to tile along the width of the standard format. For that I use the build in tile function of Zazzle. With the following result.

And the result in my Zazzle store “Fresh Patterns”.
Now, I made a bunch of wrapping paper design with the first 100 dpi tiling method. From now on I’ll use the second method in order to get the desired 200dp.
Update
I’ve made a Pinterest board for all my Zazzle wrapping and gift paper designs.